Why Replace the Default WooCommerce Quantity Field?
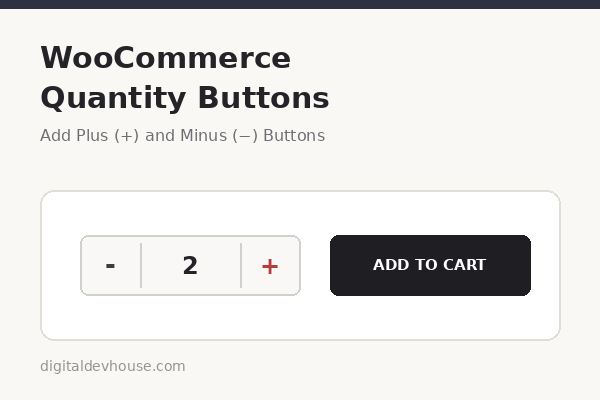
By default, WooCommerce shows a plain number input for product quantity. On desktop, this comes with small up and down arrows that many customers find fiddly to use, especially on mobile devices. Replacing it with clearly visible plus (+) and minus (−) buttons makes the shopping experience smoother, more mobile-friendly, and more visually consistent with modern ecommerce designs.
In this guide, you’ll learn how to add custom quantity buttons to your WooCommerce store using a lightweight code snippet, without installing a heavy plugin that could slow down your site.
What This Snippet Does
- Automatically wraps every WooCommerce quantity field (on the shop page, product page, and cart page) with a minus button on the left and a plus button on the right
- Increases or decreases the quantity when a button is clicked, respecting any minimum, maximum, and step values set for the product
- Works after AJAX updates too, so it keeps working correctly on the cart page when totals refresh
- Hides the default browser spinner arrows so only your custom buttons are visible
Step 1: Add the PHP Snippet
Add the following code to your active theme’s functions.php file (or better, to a child theme so it survives theme updates):
add_action( 'wp_footer', 'ddh_quantity_buttons_script' );
function ddh_quantity_buttons_script() {
    if ( ! function_exists( 'is_woocommerce' ) ) {
        return;
    }
    ?>
    <script>
    jQuery( function( $ ) {
        function wrapQuantityInputs() {
            $( '.quantity' ).each( function() {
                var $qty = $( this );
                if ( $qty.find( 'input.qty' ).length && ! $qty.hasClass( 'ddh-wrapped' ) ) {
                    $qty.addClass( 'ddh-wrapped' );
                    $qty.find( 'input.qty' ).before( '<button type="button" class="ddh-qty-minus">-</button>' );
                    $qty.find( 'input.qty' ).after( '<button type="button" class="ddh-qty-plus">+</button>' );
                }
            } );
        }

        wrapQuantityInputs();

        $( document.body ).on( 'updated_wc_div updated_cart_totals wc_fragments_refreshed', function() {
            wrapQuantityInputs();
        } );

        $( document ).on( 'click', '.ddh-qty-plus', function() {
            var $input = $( this ).siblings( 'input.qty' );
            var max = parseFloat( $input.attr( 'max' ) );
            var step = parseFloat( $input.attr( 'step' ) ) || 1;
            var currentVal = parseFloat( $input.val() ) || 0;
            var newVal = currentVal + step;

            if ( ! isNaN( max ) && newVal > max ) {
                newVal = max;
            }
            $input.val( newVal ).trigger( 'change' );
        } );

        $( document ).on( 'click', '.ddh-qty-minus', function() {
            var $input = $( this ).siblings( 'input.qty' );
            var min = parseFloat( $input.attr( 'min' ) ) || 0;
            var step = parseFloat( $input.attr( 'step' ) ) || 1;
            var currentVal = parseFloat( $input.val() ) || 0;
            var newVal = currentVal - step;

            if ( newVal < min ) {
                newVal = min;
            }
            $input.val( newVal ).trigger( 'change' );
        } );
    } );
    </script>
    <?php
}
Step 2: Add the CSS
Paste this CSS into Appearance > Customize > Additional CSS, or into your page builder’s custom CSS section:
    .quantity.ddh-wrapped {
        display: inline-flex !important;
        align-items: center;
        gap: 0;
        border: 1px solid #ddd;
        border-radius: 6px;
        overflow: hidden;
        width: fit-content;
    }
    .quantity.ddh-wrapped button.ddh-qty-minus,
    .quantity.ddh-wrapped button.ddh-qty-plus {
        all: unset;
        box-sizing: border-box;
        width: 36px;
        height: 38px;
        display: flex;
        align-items: center;
        justify-content: center;
        background: #f9f9f9 !important;
        color: #333 !important;
        cursor: pointer;
        font-size: 18px;
        font-weight: 400;
        line-height: 1;
        transition: background 0.15s ease;
    }
    .quantity.ddh-wrapped button.ddh-qty-minus {
        border-right: 1px solid #ddd;
    }
    .quantity.ddh-wrapped button.ddh-qty-plus {
        border-left: 1px solid #ddd;
    }
    .quantity.ddh-wrapped button.ddh-qty-minus:hover,
    .quantity.ddh-wrapped button.ddh-qty-plus:hover {
        background: #ececec !important;
    }
    .quantity.ddh-wrapped input.qty {
        width: 44px !important;
        height: 38px !important;
        text-align: center !important;
        border: none !important;
        outline: none !important;
        box-shadow: none !important;
        -moz-appearance: textfield;
        font-size: 15px;
        background: #fff !important;
        color: #333 !important;
        margin: 0 !important;
        padding: 0 !important;
    }
    .quantity.ddh-wrapped input.qty::-webkit-inner-spin-button,
    .quantity.ddh-wrapped input.qty::-webkit-outer-spin-button {
        -webkit-appearance: none;
        margin: 0;
    }
Step 3: Test It
Visit a product page and the cart page, then check that:
- The minus and plus buttons appear on both sides of the quantity number
- Clicking plus increases the quantity, and clicking minus decreases it
- The quantity cannot go below the minimum or above the maximum stock/purchase limit set for the product
- The buttons still work after the cart totals refresh via AJAX
If your theme or page builder has strong default styling, you may need to adjust the CSS slightly, particularly width, height, and color values, so it matches your store’s design.
Final Thoughts
Adding custom quantity buttons is a small change, but it noticeably improves usability, especially for mobile shoppers who find tiny spinner arrows hard to tap. Since this approach uses a simple snippet instead of a dedicated plugin, it keeps your WooCommerce store lightweight while still giving you full control over the design.